Easter Bunny Bags

Happy Easter!  I didn’t get a chance to have this posted until Easter because I didn’t finish putting the draw string on the bag until last night.

I’m looking for something different to do this year for Easter, so I did my usual and took to Pinterest for inspiration.  I was thinking of getting a big stuffed animal for each kid with a bag (instead of a basket) with the other goodies in it.  With the larger stuffed animal I wanted a smaller bag, but one big enough to hold some candy and other small goodies.

I came across this blog that has an adorable bunny bag!: http://judith-justjude.blogspot.ca/2016/03/bunny-bags-part-2-tutorial.html 

The instructions on the blog are really good, so I ended up “forgetting” to take a few of my normal pics.  I did make one change in how I did one part, so I will go into more detail during that part.

The first change I made was increase the size.  I outlined how big I wanted to cut each piece, and how many pieces.  I made four bags because kids ask questions if the Easter Bunny doesn’t bring THEM stuff too…and aren’t we all kids at heart anyway?  I didn’t have any fabric that screams “EASTER” and I wasn’t about to run out and get some, so I found fabric the kids would like.


After picking out the fabric, cut the pieces to size.  I made my ears in between making the bag part, I like to always have something on the sewing machine, for me it saves thread.  The quick overview is don’t sew the top two inches on both sides, but sew along the edges and bottom.  Then line up the two seams to “flatten” out the bottom, and draw a 2 inch line.  I used clips to keep the bottom in place and drew the line on both ends of each piece.


To take quick side trip to complete the ears!  I used pattern paper and traced (on my iPad screen) the ear.  This was frustrating because it’s a touch screen and kept changing…BUT I only drew half the ear, folded in half and cut it out.  Make sure your front fabric is faceing each other, then draw the ear shape on all ears.  Sew along the line, trim the extras, and turn inside out.  I used a chopstick to get the shape of the tip of the ear crips.  Then I ironed the tip of the ear while I made sure the end was flat along the seams.  I let the Iron sit on it for a few minutes, then I quickly pushed in the open end so I could. Easily sew along it.  Then sew along each end to finish the ears.


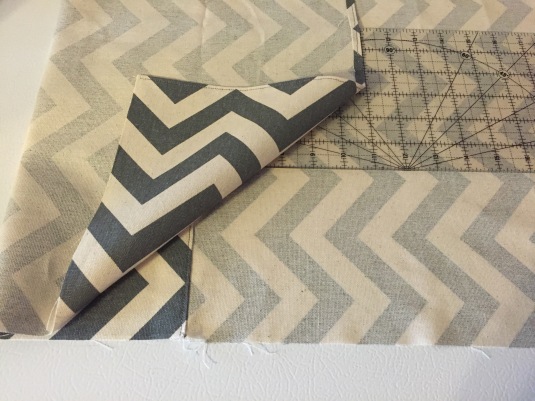
This is where it gets slightly different.  I still clip/pin the flaps together (forgot to take this pic).  Make sure to always only sew two pieces of fabric together at all times!  I started at the end of one flap, this would be the back flap that I would iron and sew it closed while I sew it against the bag.  Then the tricky part gets when you sew along the short side you will start to hit the edge of the bag that you’ve already sewn, so you need to flip fabric over to move onto the next flap.  (Top left) Once you get right up to the part already sewn, stop and leave the needle in and lift up th foot.  (Top right) Carefully flip over the top piece.  (Bottom left) as you can tell there is still one more piece, do the same and pull that piece over to the back.  (Bottom right) As you can tell you now only have two pieces.  You need to do that twice on each piece.  When you get to the end, make sure to leave a space to flip the bag right side out.


Turn the bag right side out, this can be challenging if you leave too small of a hole to flip right side out.  I tend to leave about a 2 inch hole and it worked great.


Then, use a chopstick to finish turning the flaps right side out, making the corners nice and crips!  After using the chopstick to get the corners turned out, use the iron to make the seam nice and crisp.


Find the side with the hole you used to flip the bag right side out.  Fold that piece inside to the seam and sew along the edge, that will attach the piece to the side and it will finish the open hole.  Make sure to pin this straight, if you don’t you may end up like me and not have a straight line sewn on the outside.  After you finish sewing the one side, flip it over and fold over the other end.  Then place two ears on top of the end, making sure the end of the ear lines up with the bottom of the piece folded over.  I used clips to keep the ears in place.  Sew along the bottom edge, just like you did with the other side.


Here is what mine look like at this step.  At this point it was almost time for the kids to get home, so I set it aside and finished the last part later.

Run two pieces of string through the top, I ran one string through one side, then two strings through the second side.  I tied the first string closed on the end and ran the second string through the last piece and tied it closed on the opposite side.  


They turned out SO Cute!  

DYI Tick Tack Toe Board

My kids are at the age where they love tick tack toe and other similar games.  I thought it would be nice to make a tick tack toe board for them to use when out and about.  I was thinking of making some for younger kids, so I wanted to have the playing pieces about 1 1/2 inches big.  I also wanted the front and back to be opposite fabric, both being fun looking for the kids.

It’s a pretty easy project!  You need two different pieces of fabric, one with a pattern and another solid color that matches the pattern.


First I cut three (3) 2 1/2 inche strips from both the pattern fabric and the solid fabric.  Then cut two (2) 1 inch strips from both the pattern and solid fabric.  

Take one piece of 2 1/2 inch pattern fabric and sew the 1 inch strip to the fabric.  Sew another 2 1/2 inch pattern fabric and 1 inch strip together.  Iron both flat and sew the two pieces together matching the pattern to the solid fabric.  Finally sew the last 2 1/2 inch pattern strip along the 1 inch solid strip.  You will want to do the same with the other solid 2 1/2 inch strips and pattern 1 inch strips.  Make sure to iron between steps.

How that you have a long strip of board pieces cut them 2 1/2, make sure to cut 3 pieces per tick tack toe board you are making (per side).

Cut two strips 1 inch wide that are the length of each piece, this should be about 7 3/4.  Sew the two strips between the three pieces similar to the first step above.  Make sure to iron between steps, and once the board is finished press it really good!  Take your front and back pieces and place them with the nice fabric on the inside.  You may want to trim any fabric that does not line up nicely.  Sew along each side leaving about an inch or two to flip it right side out.  Turn it right side out and use a chopstick to shape the corners.

Iron after turning right side out and be sure to iron the opening you used to turn it right side out so it’s easy to close it up when sewing along the edge.  Sew around edge and it’s done!

I purchased some large buttons from Amazon that worked really well for playing pieces!  They are all cute, fun and most important everything is washable!

Quilted Coasters

I’ve seen Pins about Quilted Coasters but I’ve never taken the time to give them a try.  I was looking at having a few coasters at work so I decided today’s the day!  The only issue I’ve had is the tension on my bobbin seems to be off and gave me a lot of issues, so before I make another one that will need to be fixed!

I opted not to put any batting or anything else in the middle because I was afraid it might get too thick and not work as well.  I will test them out at work first to see how well they work before making more.

I found a really pretty design with all triangles and decided it was time to start having fun with different triangle patterns.  I drew out the pattern and mapped out what I would need.  I made both sides the same pattern, so I doubled what’s in the note.

  • Dark Green & Light Green: 8 (16 total)
  • Light Green & Dark Pink: 4 (8 total)
  • Dark Pink & Light Pink: 4 (8 total)

For the coaster I also wanted each finished square to be 1 in x 1 in, so I wanted 1 1/2 inch squares to sew together.


I didn’t want to cut and sew so many tiny pieces so I went for the most productive way to generate many quickly.  I cut 1 1/2 inch strips of the fabric and sewed the two different colors together (right side facing inside), sew along both ends of the strips.


Take one strip and lay it on the cutting board and use the 45 degree angle to cut the triangles.  First you will need to trim the end, make sure to line up the 45 degree line with the stitching at the top.  Then change the rule around so you have a triangle, again lining up the 45 degree line with the stitching at the top.  Repeate until you have used up as many triangles as possible with the strip.  It’s hard to say how many triangles per strip because I was using scrap and they were all different sizes.


Iron each piece into squares then lay out the pieces out in the pattern you want, make sure to do this with both the front and back of the coasters.  I didn’t want to accidentally sew the wrong sides together so this worked great when there was a lot going on in the house (and I took a lunch break before finishing).


Take two pieces totgether at a time and sew.  I started at the top left on one block, then the top left on the next.  By taking one at a time it allows me to have a hole and easily remember where the other piece went.  After sewing the two pieces together I also trimmed the ends that were outside of the square, to make the entire piece square/rectangle (not shown below, I started doing that after I took pics).


After sewing two pieces together into a rectangle, I sewed the next top two pieces into squares.  Then I kept picking pieces to sew together until the block was completed.


This was rushed, and I had some serious tension issues that I was trying to work around, so they are not exactly perfectly square.  That’s what I like about home made things, they are all unique and each typically have some type of “flaw”.  Take the two pieces and place them nice fabric facing nice fabric, trim any pieces sections that are not lining up nicely.  I also flipped it over and trimmed any additional pieces that were outside the bounds.  Sew along the edge leaving about an inch to turn it right side out, I always prefer to leave the hole in the middle of a straight edge.

Turn it right side out, and use a chopstick (or something similar) to get the corners crisp.  Iron the sides flat, I pressed as hard as I could and steamed it a few times.  Make sure to iron the opening folded over so you can sew along it easily.  Sew along the outside and your done!


I actually really like these!  It turned out really nice with the exception of my tension issues.  I can’t wait to get the tension fixed so I can make more!  I’ve decided that I want to make a few for home as well.  We have sand stone coasters and sometimes the glasses sweat and stick to them, so we will see how well these work!  

Activity Bag for Kids

If you have kids, you know it can be a challenge to get them to sit for too long.  I used to stash some crayons and paper in my purse, but I just didn’t feel like the extra clutter anymore.  I also thought, as the kids got older, that different things would be fun to include.  This post will just be about making the bag, but you can fill them with just about anything!  One think I decided to stay away from are caryans because I didn’t want them to melt in the car, so I picked up some washable markers.  

I started with material, I picked up one fat quarter per bag, one zipper per bag, and a clip.  I thought 6×12 would be the ideal final size.  I also wanted the zipper to go along the long end, and I wanted to give zipper tabs a try!  Below is the final overview of what I used, each is per bag.

  • 6 1/2 x 12 1/2 inch piece for the back
  • 5 1/2 x 12 1/2 inch piece for the larger front piece
  • 1 1/2 x 12 1/2 inch piece for the top smaller front piece
  • 1 zipper that matches the fabric
  • 2 zipper tabs – They need to be at least 1/2 inch wider than the zipper and at least 5 or 6 inches long (or longer depending on how short your zipper is).  Mine ended up being 2 x 6 inches
  • 2 x 6 inch (you could make it 5 inches if needed), for the keychain strap
  • Keychain and clip.


Start by cutting your fabric for each bag.  Before cutting the zipper tabs check to see if they need to be longer than 6 inches (keep in mind it will be folded over, so I allotted about 2 1/2 inches per side).  


Zipper Tabs – The first thing I did was get the zipper ready, this started with making the zipper tabs.  Take your 2 x 6 inch pieces, two per bag and iron flat.  On one of the long ends iron about a 1/4 inch seam.  Take your zipper and slide it under the first seam and fold over the excess fabric to get the tab the same width of the zipper. Pull out the zipper before ironing, do not iron the zipper!  Iron a 1/4 inch seam on both short ends.  Last step is to fold in half and press all seams. The tabs are now easy to be seen onto the zippers. 


Time to sew the zipper tabs!  You need to avoid sewing on the metal, so keep that in mind when positioning the tabs on the zipper. When sewing the Bergen I get of the zipper, unzip slightly and use your fingers to keep the two pieces in place. 


Now that the zippers are completed, it’s time to sew the two front pieces onto the zipper.  Make sure to use your zipper foot, if you don’t have one expect to ruin a zipper or two if you aren’t perfect.  My machine came with one, once I figured out I had it – it has been a lifesaver!

Make sure the zipper is zipped all the way up, lay the zipper down with the zipper pull on the left side.  Take your small front piece and lay it on top of the zipper, look at the two ends to make sure the zipper is as even as you can.  Put it on the sewing machine with the zipper pull on the back of the machine and have the needle a little bit below the zipper pull.  My zipper had wide fabric attached, so I offset my fabric a little bit.  See the bottom images for the example.  Once you’ve sewn all the way down, the next step will be to un-zip the zipper and finish sewing the top part.

Flip the piece of fabric right side up and sew along the zipper, you should be able to go the entire length without hitting the zipper tab.  I always like to do this to give it a nice finished look and to also help secure the fabric.  I’ve also found if I don’t sew along the top like that, the zipper can get caught in the fabric from time to time.

Attach the bottom front piece similar just like you did the small top piece.  Make sure to also sew along the top.


After you finish the front piece it’s time to work on the key chain strap.  Fold the piece over and sew along the long end.  Turn the pieces inside out and iron flat.  I like to make sure the seam is in the middle when I iron.  Sew along the two edges to finish.

Now that all three main pieces are done it’s time to start laying them out.  Start with the front zipper piece.  I opened the zipper just slightly, then took the keychain piece (with keychain) and placed in the top right corner right next to the zipper pull.  I didn’t want the keychain piece to be too long so I lined it up with the base of the zipper.


After I put the keychain holder in place I used a clip to keep it in place.  Then lay the back of the bag facing down on top of the front piece.  After lining it up I clipped all four corners to get ready to sew.  


Sew along all four corners, you do NOT need to save a hole to turn it right side out becasue you have the zipper.  I always check to make sure I stitched correctly around all edges before I turn it over.  Trip off all extra fabric, then open up the zipper and turn right side out.


Turn the bag right side out and iron the edges.  Be very careful to not iron the zipper, if you do it might melt and not work.


Sew along the four edges to give it a nice finished look.  Attach the clip and your all done!


Here are a few more pictures of the finished prodcuts!  


Cloth Basket

I added shelves to my closet a month or two back and I’ve loved how it’s working out!  I just need more baskets, so I decided to finally try my hand at a cloth basket.  I also want to make a cloth basket for my trunk, the elastic net is just not working like it used to (it was for my previous car anyway so it’s OLD).  I wanted to give my closet baskets a try first so I can try them out and see if they would work for the trunk.  While I LOVE these baskets, and they work great for my closet…they just aren’t the basket for the trunk.  I will be making some slight adjustments to get stiff sides, I just need to design it. 

So, to get started, I used the basic basket idea from this blog post: http://haberdasheryfun.com/fabric/diy-reversible-fabric-storage-bin

I measured the size of the baskets I have and mapped out how to make these baskets.  I wanted the base to be 9 1/2 by 13, I also only wanted one piece of fabric folded in half (instead of sewing to pieces together, basically I didn’t want a seam on the bottom of the basket).

Figuring out the math wasn’t too difficult.  For the width I needed 13 + 9 1/2 + 2 seams, when folding it in half you will need to add 1/2 of each of the sides, plus two seams.  The second measurement will need the height of the basket plus 1/2 of the base and two seams, so 8 + 4 3/4 + 1/2 = 13 1/4.  I didn’t want the bottom seam so I doubled the number to get 26 1/2.  You will need to cut three pieces, an outside fabric, inside fabric, and Pellon 809 Bond.

Take the Pellon 809 bond and iron that onto one of the pieces of fabric, I chose the outside fabric.  Then fold in half and sew along the two edges.  After sewing I ironed the bottom edge flat so I would have a crisp line to line up the side seam with.  Then take one of the side seams and line it up against the inside iron line, do that with the other side and you will end up with a diamond.  Finally on each side draw a 9 1/2 inch line, I lined up the 10 inch mark on my ruler against the seam.  After drawing that line on both sides of each piece sew along the line.


Now that you have the base of the basked completed, take the inside fabric and turn it right side out.  Take the two pieces and tuck the inside piece inside the other, so the outside fabric is faceing eachother.  Take clips or pins and clip the pieces together, be sure to line up the seams first and add other clips around.  Sew around the edge leaving a gap, mine ended up larger than normal (about 6 inches?) due to the stiff fabric.  

After sewing, turn right side out.  The blog I used as a tutorial had you ironing the sides, I skipped that part.  I tried, but it just wasn’t working well.  I clipped the open fabric down so that is ready to be sewn around and closed up.


Sew along the outer edge to finish the basket!  That’s it!  It’s a pretty easy basket, and if you wanted to add handles you could easily do so without taking too much more time.  The baskets really did turn out great, I’m sure I will be making a few more for my closet.  

Macbook Pro Cover

We recently purchased a Macbook Pro and needed a sleeve to help protect it from scuffs and dings.  I finally had a little time on my hands so I spent less than an hour to whip out two Star Wars sleeves.  

I picked out some flanel material and decided to put some scrap batting in between to give it just a little extra protection.  The material was wide enough that folded over it would work for both the inside and outside pieces.  I cut 17 inches long, but in the end could have easily cut it about 15 inches.


Take each piece and flip it inside out then lay the batting on top of the top layer.


Sew along both ends leaving about 1/4 to 1/2 inch seam and trim each end of any excess fabric.  Flip the piece right side out and iron along both seams, to give it a nice finished look sew along both seams.


Take the MacBook Pro and fold over.  Make sure the side you want facing out is on the inside.  Use pins or clips to show where to sew along the two sides.  For me, this ended up being about 14 3/4 inches.

After sewing along each side, turn it right side out and see how it fits.  At first I made a few adjustments to both before I got the right fit.


Once you have the right fit, trim the sides and turn right side out.  That’s it!  It’s a pretty easy project and would work with many different electronics.

Closet Makeover!

My closet was in serious need of a change.  I really needed shelves and less hanging space.  I’ve thought about what I wanted and when I finally figured it out it was demo time!  Before starting I had to take down the lower clothing rack and shelf.  This was the worst part, seriously!  The “fake” screwes were a huge challenge to get out, but eventually that task was completed.  Then I measured and drew lines on the wall with where I wanted the shelves.  I also drew the top and bottom line to make sure when I put the 2×4’s for support they go in the correct place.  


The next spot was to find the studs.  I couldn’t find our stud detector so I took the corner and measured out 16 inches.  I read a magnet can help ensure you have the stud, so I took a megnet and moved it up and down until I found the stud.  I marked on the wall where each stud was and screwed the 2×4’s on the wall.  Finally I screwed each shelf to the 2×4’s with at least two longer screws.

This gives me a lot more space to work with!  I use the top shelf to store my purses, the bottom has some drawers I was already using, and the bottom shelf is for pants, shorts, pj’s etc.  I’m thinking of making some cloth baskets to make it look a bit neater.  The floor just has some junk and my shoes, but now that I have the space I can start to get it organized!

How to make a Potato Bag

The bowl potholders were such a great addition to my kitchen (and office), I decided to try and make a potato bag.  I’ve made a few adjustments from the first one, so as I make more I will use the below steps to get the perfect potato bag!

You can make them any size; in fact, I suggest making a few different sizes!  I use a smaller one at work for just me and larger ones at home for the family.

Before we start, let’s talk about fabric.  Fabric should be 100% cotton, so should the thread.  You also need 100% cotton batting.  You can pick any pattern you want for the outside.  If you want you can use the same pattern on the inside, but I like to pick a natural color that is not died.

How to get the measurements

If you want a potato bag that is 6 ½ inches wide by 9 ½ tall all you need to do is the following:

Width: To get 6 ½ inches add 1 inch for the seam, cut the piece 7 ½ inches

Height: to get the final bag of 9 ½ tall, take 9 ½ (Front) + 9 ½ (Back) + 2 (Top Flap) = 21 inches add ½ inch for the seam to cut a 21 ½ inches.

Final piece should be 7 ½ inches by 21 ½ inches.

Instructions

(1) Cut your fabric: For each potato bag cut one outside piece (My Colored Fabric), one inside piece (My White Fabric), and one piece of batting.

(2) Lay your two pieces of fabric on top of each other with the outside pattern facing inside.  Your pieces will eventually be turned inside out, so make sure you put the pattern pieces facing each other.  Then place the batting on the top of the two pieces of fabric.  The image below shows the inside out fabric and layers; you will want to stack them on top of each other.


(3) Pin or clip the pieces together once you have them lined up.  I typically have the batting a bit larger, so I will flip it over after pinning three sides and trim the batting so all three layers are exact.  I then pin or clip the side I trimmed and remove one side at a time to trim.


(4) Sew around each piece of fabric leaving a spot open to turn the piece inside out.  I typically do this on one of the short sides.


(5) In the gap you left open, separate the top and bottom fabric and turn the piece inside out.  I like to use a chopstick to press out the corners.


(6) Iron along the three sides, and for the gap iron the pieces so you can easily sew along it to sew up the gap.  I like to iron one side, flip it over and iron the other.  I inspect the gap and make sure that there is enough folded over to avoid not sewing the pieces together nicely.

(7) Sew along both short sides.  Only sew along the short sides!


(8) Place the fabric with the fabric you want on the outside facing up.  For me, I place the white fabric down and pattern up.  Fold over the top piece about two inches.


(9) Take the bottom piece and fold it up to the top of the folded over piece.  If your confused, look at the second image closely


(10) Pin the top section that has three layers


(11) When sewing, start on the side without the clip, when you get to the other edge (the side with three layers), turn it around and sew back to where you started.  I like the second stitch to help reinforce the opening edge.


(12) Turn it right side out and your done!

Classroom Chair Pockets

If you are making Classroom Chair Pockets, there’s a pretty good chance you’re a parent. Like many other parents out there, time is not something freely handed out. This project is one that I struggled to find time to sit down and make them all at once, so I’m breaking them up by days below. Give yourself a week or two and set aside an hour (or little less) to complete each step at a time. You may want to make the first one and try it on the chair to verify size before making them in mass.

The instructions are using two pieces of durable fabric with no inside liners; on average they take about ½ yard of fabric per chair pocket. If you are using thinner fabric you will need twice as much fabric for a liner (those instructions are not included in this).

Chair PocketChair

The chair I had to work with is one of those plastic chairs that are wider and thicker at the bottom. I don’t remember the exact measurements. To find the width of the chair pocket start by finding the widest part of the chair back, also measure how deep the back is at that spot. To figure out how wide to cut your pieces add the width, depth and add a seam allowance.

Each Chair pocket will need: 2 pieces – 16 inches (or a different width) x 17 inches (About ½ yard per Chair Pocket)

Times listed below will vary with sewing skill and the amount you make.

Step 1: 30-60 minutes

Look at the pattern of your fabric; does it need to go a specific direction? What is the width of your fabric? Standard width is 44 inches; as long as your width isn’t longer than about 20 inches you can get 2 pieces with one cut. The fabric I used needed me to cut each piece using the length measurement (17 inches). If my fabric were just dots, I would have cut using the width (16 inches) to save fabric. Note: If your fabric is really wrinkly, you may want to iron it to ensure an accurate cut.

Before you cut take one end of the fabric and make sure the long side ends are matched up (to keep the cuts straight). Trim off the end of the fabric using the folded edge of the fabric to square it off.

Next, with the width of the fabric it can be difficult to read the measurements on the cutting board (depending on the size), so I used two rulers to measure. Take the one that is the easiest to read and measure out from the edge your just trimmed, use the second ruler as the ruler to cut with (they should make a “T” like the picture below).IMG_3985

I needed 17 inches, when cutting lots of pieces using this method I try to add a little extra to ensure I have enough so I cut 17-1/8 inch. Before you cut, make sure you are cutting even. I started by measuring in the middle and moving the ruler along the entire width to make sure the ruler I’m using to cut isn’t un-even. Also make sure you look at the folded edge to make sure you didn’t have an un-even cut, if you do just trim off as little as possible (I did have to do this once). Don’t rush this part; you don’t want to waste fabric!

As you cut each piece, pull the fabric up and ensure the edges are straight so your cuts are even and as accurate as possible.  When I was done cutting them I had 15 pieces that were 17 inches tall and as wide as the fabric, one of the pieces will be one chair pocket.

Step 2: 30-60 minutes

Each piece you have should be cut in one direction; the next step is to cut each of those pieces into the final size. If the fabric is wrinkly make sure to iron it first, I end up doing this to a few of the pieces that were cut on a fold but most were ok.

Keep the fabric folded in half, it will allow you to cut both pieces with one cut. Take one short edge of the fabric and square off the edge, if the fabric has an ugly edge cut enough to remove the ugly part. Sometimes one side has a bigger ugly edge, make sure you cut both ugly pieces off when trimming.

Chair Pocket 04a


Using the cutting board ruler or a second ruler measure cut your second measurement, in my case I measured out 16 inches. Repeat this for all the pieces you have, putting the 16×17 pieces in one pile and the scrap in a second pile.

Step 3: 30 minutes

Take two pieces and place one piece right side up, take the second piece and place on top of the first one right side up. Do not sew right sides together and don’t sew back sides together, if you do you will have ugly sides showing.  By sewing tow pieces together it may feel very wrong, but it will allow you to not have any ugly sides showing.  Sew along one of the 16 inch sides.  I saved thread by not cutting the thread after the first one and kept sewing.  Once I sewed a few inches on my next one I trimmed the edge on the previous piece.

Step 4: 3 hours

When Ironing I try to make sure I sew right after, otherwise I might need to re-iron if I store it for another day. If you don’t have the time I suggest you break this up and do about 5 pieces at a time, it should take about an hour.  (More or less depending on your sewing skill)

Iron flat the seam on the 16 inch side, also iron a seam on each of the ends.

Sew along the part you ironed flat, make sure to sew the seam flat on the back. Sew each of the 16 inch seams you ironed.

Chair Pocket 11a

Step 5 – 1 hour

At this point you should have all the prep work done; each chair pocket should be one piece, have the ends sewn to stop fraying, and have the middle seam sewn to reinforce. Watch these steps closely, if you sew the next few steps incorrectly the middle seam could show the ugly side slightly.

Lay the fabric on a flat surface with the nice seam up. Take a ruler and measure 11 inches (This will be the pocket), than pin or clip the ends on each side.  Make sure when folding over the “nice” fabric is on the inside as you will be turning this inside out when you’re done.

Chair Pocket 12a

I put between 7 and 8 pieces layered on top of each other on my ironing board, than I ironed the folded edges.

Sew along the edge on both ends. Below is what the front and back of your pieces should look like.

Step 6 – 2-3 hours

Start by turning the pocket right side out, make sure the corners are crisp (I use a chopstick to help with that).

Chair Pocket 17

After turning inside out you will notice that where the pocket ends the fabric needs to be trimmed. Trim just enough so you can iron it the opposite direction.

Iron the pocket flat and press the side seams. Flip the whole piece over and iron the side seams.

With the pocket facing down, take the end with seams and fold over just below middle seam like the image below. This should give about an 8 inch pocket that when finished will pull over the chair.  Make sure to iron flat, this is the last time you will need the iron.

Sew along both edges. I would suggest going slightly past where you need to sew to and back stitch to reinforce. Once you sew along both sides you’re done!

Chair Pocket

Dog Treats! Yum!

This isn’t a “craft” post, but it was a huge kitchen success my oldest and I had.  When my oldest was off school one day we decided to make some cookies.  As we made the cookies our dog just kept looking at us with those puppy dog eyes hoping for a taste of something yummy, so we added onto our cooking day and decided to make some dog treats.

I know this post is lacking pitchers, but I wanted to spend some quality time with my little man, and the link below has lots to make up for it.

Our dog can be a little picky when it comes to treats, so I figured worst case my son and I could have some fun cooking.

We decided to try this Homemade Peanut Butter Dog Treats recipe.  I was excited it had pumpkin as one of the 4 ingredients (Yes, only 4!) because I have a freezer full of pumpkin!  I took the equivalent of 1 can of pumpkin and used that to make a double recipe.  I also added at least twice the peanut butter suggested (I thought it tasted a little bland).

I cooked the dog treats 25-30 minutes, and when I placed them on the pan I let them touch so I could get as many pans cooked as possible.  We have larger pans and cooked about 4 large pans worth.

I re-rolled the dough until I couldn’t fit a single piece, than I just cooked the last chunk.

These treats were not only dog approved, but also kid approved!  They really do smell good, my son asks for one all the time!  We will defiantly be making many more batches, I’ve never seen my pup more excited about a treat.

After they cooled I placed them in snack size zip lock bags.  I keep kept two bags out and froze the rest; once we are almost done with one bag I grab another.  I’m not sure what the shelf life is, so I figured the freezer would be the best place.

IMG_3925

Previous Older Entries